FLiTrak3D
FLiTrak3D (or FLIT for “FLight Insect Tracker”) is a Python package for the tracking the 3d kinematics of animals (e.g. flying insects) build around DeepLabCut
Introduction
This package allow the estimation of animal kinematic parameters (positions and angles) by fitting a 3d skeleton to 2d tracking results from DeepLabCut (DLC).
The usual steps (see more details below in 'Usage'):
- Pre-processing of video recordings (at least 2 cameras): image enhancement, dynamic cropping around moving animal and the stitching of multiple camera views. These cropped and stitched images are then saved in a single video per recorded event. Videos will be analysed later using DLC. This preprocessing step allow a significant increase of the tracking quality of DLC (see our method paper).
- Selecting or defining an animal 3d skeleton that will be used for the tracking. You can use a previously made skeleton (e.g. fly), or make your own from body and limbs modules (see the section below).
- Training of a DeepLabCut (DLC) network (Outside this package): usually done using the DLC user interface. You will most likely need to manually label 100-200 images. See the section below regarding how to correctly choose and tweak DLC settings in order to get good tracking results with stitched images.
- Running DLC analysis on the full dataset to track the position of the skeleton joints on all the images of your recordings.
- Loading DLC results in dlc_flytracker to convert the DLC results into the .csv files that will be used in this package.
- Reconstructing 3d coordinates of the skeleton joints from their 2d coordinates tracked with DLC.
- Fitting the 3d skeleton to the 2d or 3d coordinates of the joints.
- Post-processing of the kinematics parameters: removing outlier, using low pass filter, interpolating missing datapoints and smoothing timeseries.
Citation
If you use this code, we kindly ask that you please cite our method paper: Cribellier et al, ??? - To be published. And of course, please cite the Deeplabcut articles: Mathis et al, 2018 and Nath, Mathis et al, 2019..
Getting Started
Installation and prerequisites
dlc_flytracker requires Python version 3.8. It depends on the Python packages deeplabcut, tensorflow and other common packages like numpy, scipy, matplotlib, which are specified in requirements.txt.
To guarantee that you have a Python 3.8 installation, regardless of your system's Python version, it is most convenient to create an Anaconda environment to install the dependencies of dlc_flytracker. Miniconda is a minimal distribution of Anaconda. Be aware that this is only free to use for academic use; commercial users need to pay a licence fee. Install it (or another Anaconda distribution) with the installer, Windows, Linux and macOS versions are available.
Create and activate a new environment:
conda create -n "dlc-flytracker" python=3.8
conda activate dlc-flytracker
dlc_flytracker transitively depends on the HDF5 library. Install it system-wide with e.g. sudo apt install libhdf5-dev on Ubuntu, or install it in your currently active Anaconda environment with conda install -c anaconda hdf5.
Then, install all dependencies from PyPI with pip:
pip install -r requirements.txtAlways activate this environment before running dlc_flytracker with:
conda activate dlc-flytrackerExperimental data and folder structure
Before using the package, you will need video recordings of moving animals (e.g. flying insects). Each event should have been recorded by multiple synchronized cameras. Ideally the camera would have been positioned at 90° angles from each other, thus maximizing the amount of original information that each camera is recording. Your cameras should not have been moved (or of a minimum amount) during the entire time during which the videos have been recorded.
You should have recorded data necessary to generate a DLT calibration (i.e. 2d pixel coordinates of points of known 3d positions for all cameras). If the cameras moved slightly between experiment, you will need an additional calibration. We recommend recording calibration data once a day. DLT coefficients can be generated using camera.calib.estim_dlt_coef or camera.calib.estim_mdlt_coef (see here).
Although it is possible to use various folder structures, we recommend saving all the recordings made with one camera in a dedicated folder. Each recording usually consisting of a folder containing the all recorded images of a particular event and which name indicate the time and date of the recording (e.g. cam1_20221029_115612).
Usage
Here the main steps introduced earlier are explained in more details and with examples.
There is two ways of processing video recordings:
- By following the steps below (the preferred way if it is your first time). Please notice that doing so will generate a yaml file (saved at each step) that can then be used to run automatically the full analysis. Example scripts can be found here.
- By using the function
process.batch_processing(yaml_path), you can automatically run the processing of all your recordings. Settings for the batch processing will be read from a yaml file such as this one.
Initialization
The processing of your recordings need to be done using the BatchProcessing class. You can initialize it using:
from process.batch_processing import BatchProcessing
img_process = BatchProcessing.from_directory_by_names(recording_paths, framerate, save_path)
OR alternatively:
img_process = BatchProcessing.from_directory_by_dates(recording_paths, framerate, save_path)With recording_paths being a list of paths (a path per camera) towards directories that contains the recording(s) (folder(s) with all recorded images of an event by a camera).
Pre-processing of video recordings
These steps allow the generating of .avi videos that will be analysed later by Deeplabcut (See example in the Jupyter notebook for pre-processing).
-
Image enhancement: (Optional)
img_process.enhance_images(fn_name, factor)withfn_namethe name of image characteristic to enhance (can be: 'contrast', 'brightness', 'sharpness' or 'color'). By enhancing the recorded images, you will make it easier to label body features later with DLC. -
Cropping of the recordings: To reduce the size of the images that will be analysed by DLC.
-
Cropping around a fixed position:
-
Crop all frames:
img_process.crop_images(height, width)
-
Crop all frames:
-
Dynamic cropping around moving animal:
-
Manual tracking:
-
Manually track single animal per recording:
img_process.manual_tracking(dlt_path) -
Crop all frames:
img_process.crop_images(height, width)
-
Manually track single animal per recording:
-
Automatic tracking:
-
Select a subsample:
img_process.sample_images(step_frame) -
Do 2d tracking (blob detection) on images:
img_process.track2d(from_fn_name='sample') -
Do 3d reconstruction of tracks:
img_process.recon3d(dlt_path, from_fn_name='sample') -
Crop all frames:
img_process.crop_images('sample', height, width)
-
Select a subsample:
-
Manual tracking:
-
Cropping around a fixed position:
-
Rotate one or multiple views: (Optional)
img_process.rotate_images(degrees, camn_to_process=[camn])This step can help the labeling of the body features using DLC. -
Stitching of multiple camera views:
img_process.stitch_images()Will stitch all views together for each frame. By stitching all views of the same animal together, you will allow DeepLabCut to learn correlation between the different views, and therefore you will improve the overall tracking accuracy. See section TODO! for more details. -
Save each recording in an .avi :
img_process.save_avi()
Select or define an animal skeleton
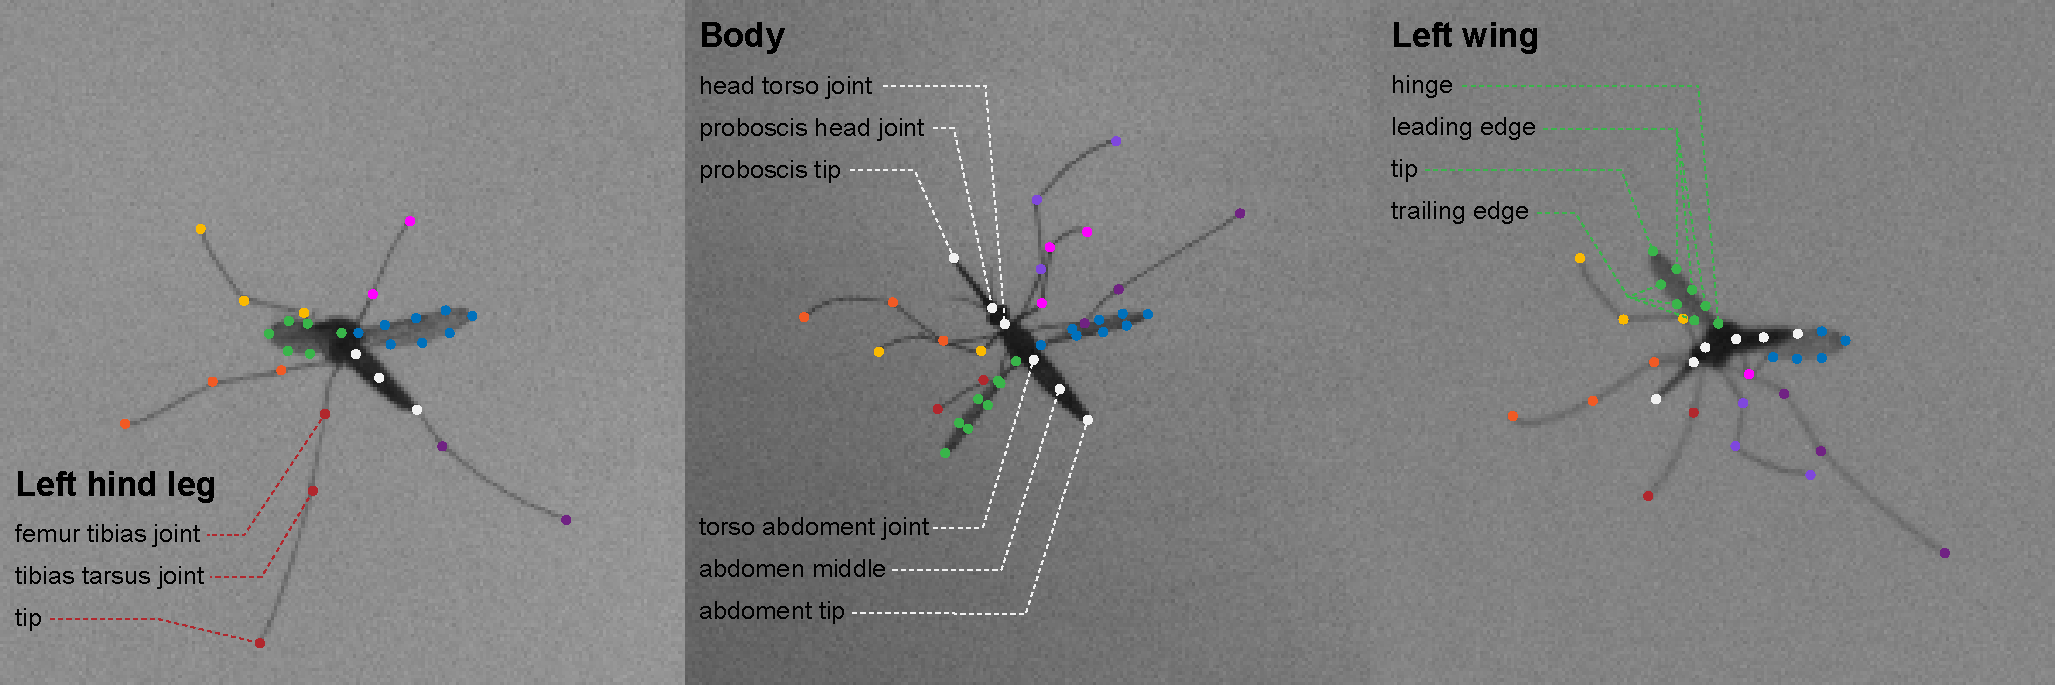
An animal skeleton is defined as one body module + one or several (pair(s) of) limbs module(s). For example, a fly skeleton can consist of an insect body (three jointed segments for the head, thorax and abdomen + one segment between the two wing hinges) and two wings (here defined as flat). Each limb module consist of symmetrical limbs (one left and one right limb).
You can select an already defined animal skeleton (see /skeleton_fitter/animals).
OR
New animal skeletons can be defined by confining bodies and limbs modules (see /skeleton_fitter/modules). See example animal skeleton, example body module and example limbs module for more information on how to build your own skeleton and modules.
in DeepLabCut: You will need to use the exact same naming convention for the body joints in DLC.
Training a network in DeepLabCut
Using the DLC user interface. You will need to train a DLC network that is capable of tracking accurately the joints of your skeleton in all recorded views. This will require to manually label around 100-200 images. Tutorials on how to use deeplabcut are available here.
This step is very important, final tracking accuracy will be heavily dependent on how good the training dataset is. See the example config.yaml to see an example and how DLC settings can be tweaked in order to get good tracking results with pre-cropped and stitched images.
Run DLC analysis on the full dataset
Once you are happy with a DLC network that you trained on you data, you can run the analysis of you entire dataset with:
img_process.analyse_dlc(dlc_cfg_path, shuffle, trainingsetindex, batch_size, model_name)
Load the DLC results in dlc_flytracker
You can convert tracking results from DLC to the data format used in this package using:
img_process.load_dlc(model_name, tracker_method, dlt_path)
This conversion consist of:
- Reading the results files from DeepLabCut.
- Unscrambling, by checking that 2d points have been detected in the correct view. If not, the points will be associated to what is thought to be their correct view number.
- Reversing the pre-processing by converting the 2d coordinates tracked with DLC in the original 2d coordinates of the recorded images (so before any cropping or stitching).
- Reconstructing the 3d coordinates of the skeleton joints from their 2d coordinates.
Kinematic tracking
Estimate kinematic parameters by fitting of the 3d skeleton to the 2d/3d coordinates of the joints using:
img_process.fit_skeleton(animal_name, model_name, fit_method, opt_method, dlt_path, multiprocessing=True)
You will need to choose an optimization method (e.g. opt_method = 'nelder-mead', 'powell' or 'leastsq').
And you will need to select a fitting method (e.g. fit_method = '2d' or '3d'), to decide if the skeleton will be fitted to the 2d or 3d coordinates of the joints. It is also possible to fit the body to a hybrid skeleton that use the average position of the limbs to improve accuracy ot the kinematic tracking of the body (fit_method = '3d_hybrid').
Notes
Running the tests
To run tests locally, navigate to the tests/ directory, then run pytest with:
cd tests
pytest
License
This project utilizes the LGPL LICENSE. Allows developers and companies to use and integrate a software component released under the LGPL into their own (even proprietary) software without being required by the terms of a strong copyleft license to release the source code of their own components. However, any developer who modifies an LGPL-covered component is required to make their modified version available under the same LGPL license.